Last updated: 10th February 2025
HTML tables provide an effective way for developers to display data in rows and columns. While many developers today use lightweight alternatives like <div> elements, HTML tables remain a powerful and useful tool for presenting text, images, and links in a structured format. In this article, I’ll show you a simple method to dynamically add rows to an HTML table using jQuery. This technique is essential for scenarios where you need to extract and display data dynamically from a remote source, such as a database. Read on to learn how to enhance your web applications with dynamic table rows using jQuery.
See this demo
This example is especially helpful when you don't have a complete dataset at design time. Instead, you can dynamically extract data from a remote source, such as a database, and display it in a tabular format on your web page. This approach allows for real-time data retrieval and display, making your web application more responsive and efficient.
Example:
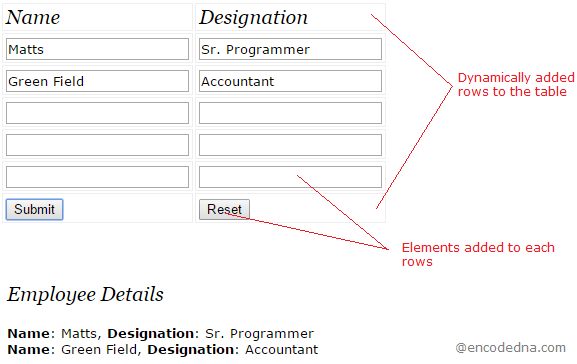
Now, let’s design a simple form using the above procedure and methods. Dynamically I wish to add input boxes (inside <td>) in each newly added row, also add two buttons, one to submit the form data and another to reset the form (clear all the input boxes).
The Markup and the Script
<!DOCTYPE html>
<html>
<head>
    <title>Dynamically Add Table Row using jQuery</title>
    <script src="https://ajax.googleapis.com/ajax/libs/jquery/1.10.1/jquery.min.js"></script>

    <style>
        table
        {
            width: 100%;
        }
        table, th, td
        {
            border: solid 1px #DDD;
            border-collapse: collapse;
            padding: 2px 3px;
            text-align: center;
        }
    </style>
</head>

<body>
    <p>Click the button to add rows to the table!</p>
    <p><input type="button" id="bt" value="Click to add rows!" /></p>

    <!--// Add the table tag (only). We'll add rows dynamically.-->
    <table></table>
</body>

<script>
$(document).ready(function () {

    $('#bt').click(function () {
      const $table = $('table');
      $table.empty();

      // Append table header.
      $table.append('<thead><tr><th>Name</th><th>Designation</th></tr></thead><tbody></tbody>');
      const $tbody = $table.find('tbody');

      // Add rows dynamically using an array of 5 elements.
      for (let i = 1; i <= 5; i++) {
        $tbody.append(
          `<tr>
<th><input id="name${i}" type="text" class="input" /></td>
<th><input id="desig${i}" type="text" class="input" /></td>
  </tr>`
        );
      }

      // Add Submit and Reset buttons at the end of the table.
      $tbody.append(
        `<tr>
<td><input type="button" id="btSubmit" value="Submit"></td>
<td><input type="button" id="btReset" value="Reset"></td>
  </tr>`
      );

      // Handle Submit button click.
      $('#btSubmit').click(function () {
        let values = '';

        $('.input').each(function (i) {
          const nameValue = $(`#name${i + 1}`).val();
          const desigValue = $(`#desig${i + 1}`).val();

          if (nameValue) {
            values += `<b>Name</b>: ${nameValue}, <b>Designation</b>: ${desigValue}<br />`;
          }
        });

        // Display the extracted values.
        const $divResult = $('<div>', {
          css: {
            padding: '5px',
            width: 'auto'
          },
          html: `<p><h3>Employee Details</h3></p>${values}`
        });

        $('body').append($divResult);
      });

      // Handle Reset button click.
      $('#btReset').click(function () {
        $('.input').val('');    // Clear all text fields.
      });
    });
  });
</script>
</html>