👉 See this page and this. If you scroll further down, you will find that few important things are shown using an HTML table. This makes the content more readable. Now just imagine, if these are shown in plain text.
There are many advantages of using an HTML table in your website. You can make the tables "attractive" and "interactive", which will keep visitors on your website for a longer period.
I use HTML tables extensively in websites that I design for my clients.
Now, the questions is, how to generate HTML table code with CSS automatically? To do this easily and quickly, I have designed a simple tool called HTML Table Generator with CSS.
HTML table generator tool - What does it do?
The HTML table generator, allows you to generate an HTML table code and a CSS code for your website or blog. It saves time. You can simply choose a Theme from the options or design a table of your choice using other options. Once you are done, "copy the code" and paste it in your website or blog.
How to use this tool?
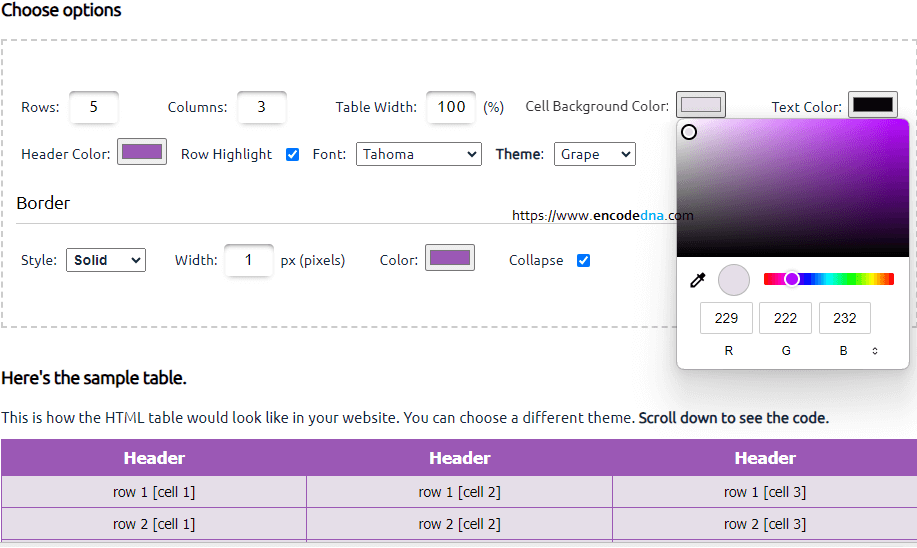
When you open the tool, you will find an option box with the heading Choose options, followed by a "sample table" with code.
In-addition, you'll have a ready made HTML table with 5 rows and 3 columns, with default colors etc. See the below image.
Click to zoom out.

These options will help you create an HTML table on the fly. It has some basic but important options like number of rows and columns for the table, you can adjust the table width... Alright, let me explain each option one by one.
1) Rows: The default is "5". That is 5 rows are added automatically. You can change the default number to any other number according to you requirement.
2) Columns: The default is "3". 3 columns are already added to the table. You can change the default number of columbns to any other number to suits you requirement.
3) Table Width: The default is "100%". The table width is an important parameter in a table. You can adjust the table width according to your requirement like "50%" or "80%" that fits a particular location in your blog or website.
4) Cell Background Color: The background color of each cell. Click the color palette box to choose the color that you want to set for cell background. It "automatically" make changes to the sample table and its code. Do it yourself and see the output.
Click to zoom out.

5) Cell Text Color: The default color is "White" (hexcode: #ffffff). Click the color palette box to choose a different color the cell text.
💡 You can use our Hex to RGB Converter tool to convert Hex color code to RGB (red, green and blue).
6) Header Color: Click the Header color palette to choose a color the table header. It will automatically set (or change) the HTML code with the color you have selected.
7) Row Highlight: If checked (or selected) it would "highlight" rows when you hover the mouse over the table rows. Will not effect the Header. The default is "checked".
8) Font: You can choose a Font of your choice from a list of 10 pre-defined fonts.
9) Font Size: The default font size is 16. You can choose a different font size for your table.
10) Theme: Choosing a theme is always an important step before creating a website, a blog or a table. Therefore, I have added a list of pre-defined themes that you can choose from. It will "save your time". All you have to do is, choose a theme and it will automatically add to the table structure.
11) Border Style: Tables have border of different styles and shapes. Therefore, you can choose a particular border style for the table, like "solid", "dashed", "dotted" etc. The default border style is "Solid".
12) Width: The width of table borders can be increased or decreased by assigning a number to the width attribute. Simply enter a value in the box like 2, 3 etc. The defauld border width is 1.
13) Border Color: You can adjust the color of the table borders. Click the color palette and choose a color of your choice. Just make sure it does look odd.
14) Collapse: When you choose this option, it will ensure that there are no extra space between cells and the outside of the table. Simply, check and un-check the option and see what how it effects the table. The default is checked.
Remember, everytime you make any changes in the options, it will change the CSS and Table codes.
Next, there's a sample table just below the "options" box. The sample table is a reflection of what options you choose. It actually shows that your HTML table is ready, or may be, it needs some changes.
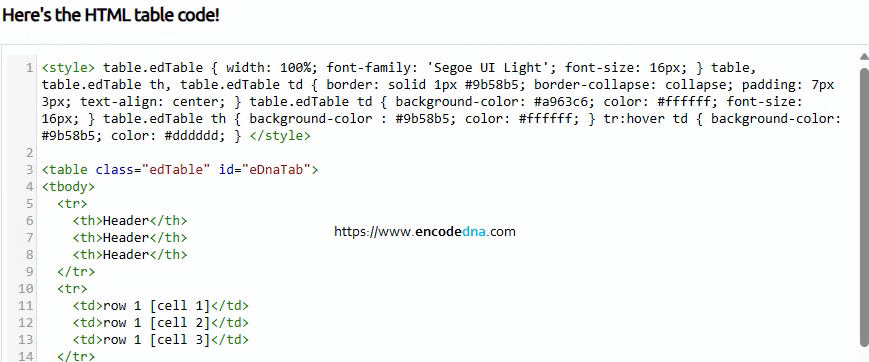
Finally, you can see the HTML code along with CSS (or style) code. See it here.
Click to zoom out.

There's a button below the code box. Click the button and the entire code will be copied in the clipboard. Paste the code in your website.
That's it. Using few simple options, you can generate an HTML table code with CSS. Its a simple tool. However, if you have any comments or suggestions, which you think will improve this tool, please drop a line at,
arunbanik21 [at] rediffmail.com
