Last Updated: 20th September 2025
Want to make your Excel sheets more interactive? With a simple VBA macro, you can dynamically hide or show entire columns, no buttons, no manual steps. In this post, I’ll walk you through a practical example where clicking on a specific cell instantly hides or shows a column, creating a seamless user experience.
📑 Table of Contents
1) Why Use VBA for Column Toggling
2) Use Case: Hide/Show Column on Cell Click
3) Writing the Macro
4) How the Macro Works
5) Using Intersect to Target Cells
6) Controlling Visibility with Hidden
7) Conclusion
Why Use VBA for This Task?
Excel formulas can't respond to clicks. They only react to data changes. VBA lets you create event driven behavior, like responding to a cell selection (Worksheet_SelectionChange).
Instead of manually hiding/unhiding columns, users just click a cell. This is especially helpful in dashboards or reports where you want to toggle visibility without cluttering the interface.
VBA gives you full control over how Excel behaves based on user input.
Use Case: Toggle Column Visibility with a Cell Click in Excel
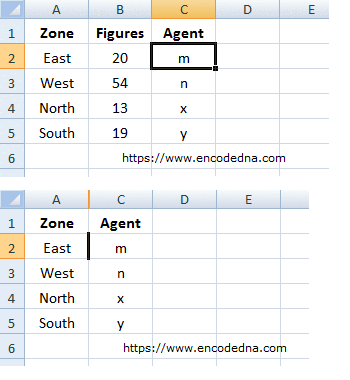
There are plenty of "scenarios" where you might want to show or hide columns in Excel based on specific conditions or user actions. In my case, I have a worksheet with two columns containing a few rows of data. I want to make the second column (see the above image) disappear when someone clicks on cell B2. Then, when they click on cell C2, the column should reappear. This simple interaction creates a cleaner, more dynamic experience for anyone using the sheet.
So, let's begin.
• First, create an Excel file and save the file as a macro (.xlsm format). Add two columns in Sheet1. Right click Sheet1 and choose the View Code option. This will open the VBA editor. Copy and paste the below code in your editor.
The Macro
Option Explicit

Private Sub Worksheet_SelectionChange(ByVal Target As Range)
    If Selection.Count = 1 Then

        If Not Intersect(Target, Range("B2")) Is Nothing Then   ' Check if cell B2 is clicked.
            Target.EntireColumn.Hidden = True      ' If yes, hide entire "B" column.
        ElseIf Not Intersect(Target, Range("C2")) Is Nothing Then
            ' Show (or unhide) the hidden "B" column when clicked on cell “C2”.
            Cells(Target.Row, Target.Column - 1).EntireColumn.Hidden = False
        End If
    End If
End Sub
How the Macro Works
I've placed my macro inside the Worksheet_SelectionChange event, which automatically triggers whenever a user selects any cell in Sheet1. However, I’ve tailored the logic so that it only performs an action when the user clicks specifically on cell B2 or cell C2. This ensures that the macro remains efficient and only responds to the intended triggers.
Understanding Intersect in VBA
If you see the macro again, I have used the Intersect() function in the "If...ElseIf" condition. When you use the Worksheet_SelectionChange event, it triggers every time a user selects any cell on the worksheet. But you don't want your macro to run for every cell, just for specific ones like B2 or C2.
That's where Intersect comes in. The Intersect function checks whether two ranges overlap. So, the condition means, "If the cell the user clicked (Target) intersects with cell B2, then run the code."
If Not Intersect(Target, Range("B2")) Is Nothing Then ' Check if cell B2 is clicked. In both conditions of the macro, I’ve used the EntireColumn property. This property returns a Range object that represents the entire column of the selected cell. Once I have access to that column, I use the Hidden property to control its visibility.
Target.EntireColumn.Hidden = True
Controlling Visibility with the Hidden Property
In VBA, the Hidden property is used to determine whether a row or column is visible. It returns a Boolean value, True if the row or column is hidden, and False if it's visible. You can also assign these values directly to hide or unhide elements.
👉 This property works for both columns and rows, making it a versatile tool for customizing worksheet visibility.
In the ElseIf condition of the macro, the code checks whether cell "C2" has been clicked. If so, it sets the "Hidden" property of the target column to False, effectively unhiding it and making the data visible again.
Note: Properties and their values in VBA are case sensitive.
Conclusion
This VBA trick is simple but still highly relevant. It adds interactivity to your Excel sheets, making them cleaner and more user friendly. Whether you're building dashboards (where you want to toggle views without clutter) or guided reports, toggling columns with a cell click is a smart way to streamline the experience.
