Add Data Entry Form in Excel
Let us assume, I have a spreadsheet with few columns in it. The data I am entering, is in tabular format.

By default, the form tool is hidden. So, you have to make it visible. By visible I mean, the form tool must be added into the Quick Access Toolbar.
Note: Excel forms is supported in all version starting from Excel 2007 till Excel 365. But its not supported in Excel for Web.
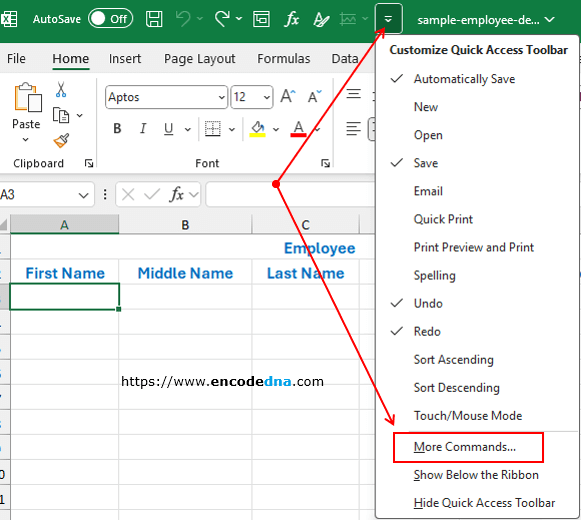
1) In the "Quick Access Toolbar" (at the top of the Excel file), you will see a small "down arrow". Click it and choose "More Commands".

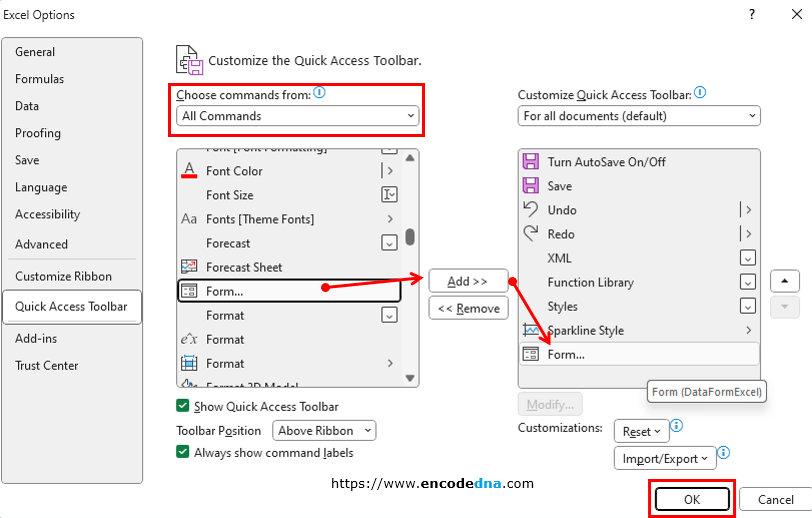
2) It will open "Excel Options" dialog box. Under "Choose commands from", select "All Commands".
In 2019 edition, you can go to "File" -> "More..." and choose "Options". It will open "Excel Options" dialog box. Click "Quick Access Toolbar" option and under "Choose commads from", select "All Commands".
3) Scroll down the list of commands, find Form... and select it.
4) Click the Add >> button to add the "Form..." in the quick access toolbar list.
5) Press the "OK" button.

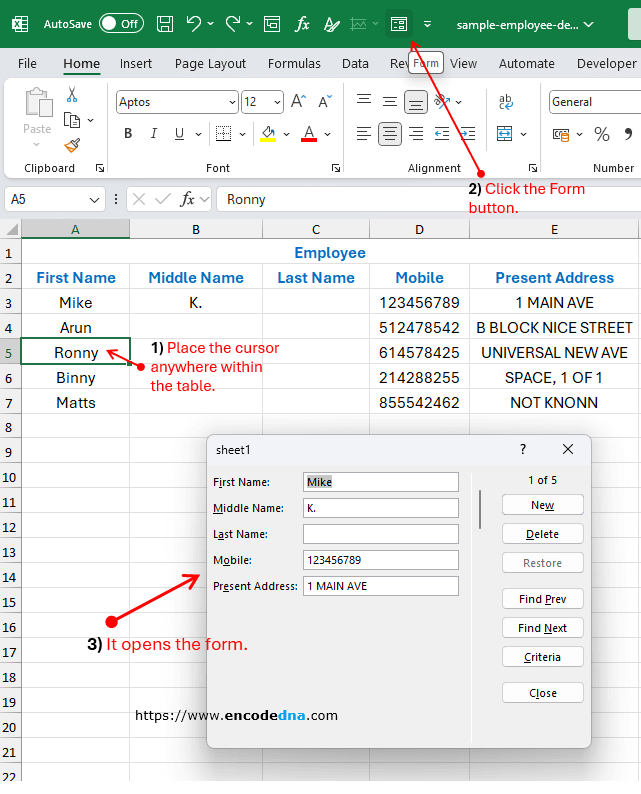
It will add the "Form" icon in the "Quick Access Toolbar".
![]()
You are now ready to use the data entry form.
Place the cursor in any cell within the "table" and click the "Form" button in the Quick access toolbar.

The input form, as you can see in the above image, has few buttons.
* New: Click this button to create and add a new record. The record will be added after the last record (if any).
* Delete: Use this button to delete the current or selected record.
* Restore: The original record will be restored.
* Find Prev: Use this button to find the previous record. Alternatively, you can use the "Scroll bar" to find next or previous records.
* Find Next: Use this button to find the next record.
* Criteria: This is the search button. In case you have are large dataset, this option is useful. For example, click the Criteria button, type the First Name and press the Enter key. It will show all the values associated with the first name.
* Close: To close the form.
In-addition, it has a Scroll bar (separating the input boxes and buttons). Move the scroll bar up and down to see the records in each row.
➡️ Note: If you add a new column in your worksheet, it will show the newly added column in the form.
Remember, the dataset or the records in your worksheet should be in "tabular" format or it should be an Excel table, if you want the form tool to work properly. You must place the cursor inside the table or at the next row after the last row.
