Last updated: 15th January 2025
You can utilize the jQuery DatePicker control to handle date-related functions in your ASP.NET applications. This control can be attached to any form input field. In this article, I'll demonstrate how to bind the jQuery DatePicker control to an ASP.NET TextBox control and how to access the selected date from your code-behind procedure using both C# and VB.NET.
The jQuery DatePicker control offers user-friendly functionalities and can be easily bound to any input field. Consequently, you can attach the DatePicker to an ASP.NET TextBox control.
To get access to the DatePicker control, you’ll have to add the plug-in’s CDN to your web page, inside the <head> tag.
<head>
<link rel="stylesheet" href="https://code.jquery.com/ui/1.12.0/themes/base/jquery-ui.css">
<script src="https://code.jquery.com/jquery-1.12.4.js"></script>
<script src="https://code.jquery.com/ui/1.12.0/jquery-ui.js"></script>
</head>
Next, add an Asp.Net textbox control to your web page, inside the <body> tag.
<body>
    <div>
        <asp:TextBox ID="tbDate" runat="server" placeholder="Select a Date"></asp:TextBox>
        <asp:Button Text="Submit" ID="submit" OnClick="btClick" runat="server" />

        <%--SHOW THE SELECTED DATE.--%>
        <p id="newDateFormat" runat="server"></p>
    </div>
</body>
The Script to add DatePickter Control
Since the Date Picker is a jQuery control, you will need a small script to bind or attach the textbox control to the DatePicker.
<script>
    $(document).ready(function () {
        $('#tbDate').datepicker({
            dateFormat: 'dd/mm/yy'      // set a default format. you can change the format from code behind.
        });
    });
</script>
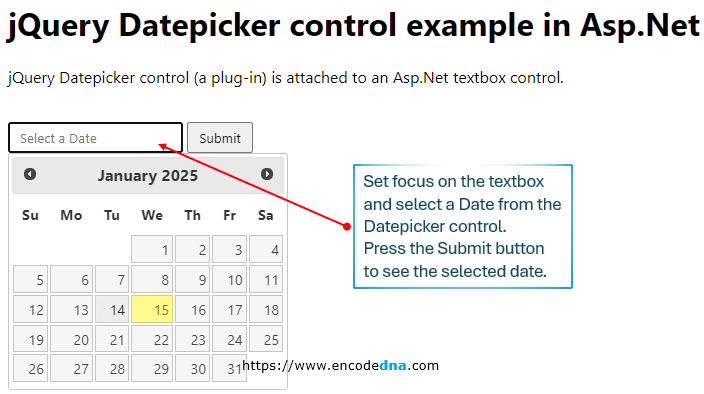
Now, run the application and you will see the textbox. Set focus on the textbox control and it will popup a calendar showing the current month or the current year. You can modify the above script and set date format according to your choice.
This jQuery widget comes with many useful functions and you can attach it with any input control.
Now, let’s see the code behind procedure showing how to get the selected date from the DatePicker or the textbox using C# and Vb.Net.
If you see the above markup, I have a Button control on my web page. I’ll write the code inside the button’s click event.
using System;

public partial class SiteMaster : System.Web.UI.MasterPage
{
    protected void btClick(Object sender, EventArgs e)
    {
        string sDate = "";

        if (!string.IsNullOrEmpty(tbDate.Text.Trim()))
        {
            // CONVERT DATE FORMAT.
            sDate = DateTime.ParseExact(
                tbDate.Text, "dd/MM/yyyy", null).ToString("MM/dd/yyyy");

            // do not parse if you don't want to change the format.
            //  Simply use sDate = tbDate.Text;

            selectedDate.InnerHtml = sDate;       // SHOW THE FORMATED DATE.
        }
    }
}
You can get the selected date from the textbox using the .text property. However, I am also formatting the date from the default to another format using the ParseExact() method. This is optional. I am just showing, what else you can do with the date, other than simply selecting it.
Option Explicit On

Partial Class Site
    Inherits System.Web.UI.MasterPage

    Sub btClick(ByVal sender As Object, ByVal e As EventArgs)
        Dim sDate As String = ""

        If Trim(tbDate.Text) <> "" Then
            ' CONVERT DATE FORMAT.
            sDate = DateTime.ParseExact(
                tbDate.Text, "dd/MM/yyyy", Nothing).ToString("MM/dd/yyyy")

            selectedDate.InnerHtml = sDate     ' SHOW THE FORMATED DATE.
        End If
    End Sub
End Class
Well that’s it.
➡️ Don’t worry if you do not have access to any Asp.Net built-in Date picker control. You can easily use the jQuery DatePicker control in your Asp.Net application, as this widget comes with many useful functions. In fact you can tie this widget to a <div> or <p> element. For example, here’s how you can bind it to a <div> element:
<!--add datepicker to a DIV element-->
<div id="div"></div>

$('#div').datepicker({
    dateFormat: 'dd/mm/yy'
});
