If you are new to WebGrid or MVC, then you must see this tutorial, where I have explaind about WebGrid and how to use it in Asp.Net, in detail.
👉 I am assuming you have MVC 4 or later installed in your computer. Or else you can download and install MVC from Microsoft's site.
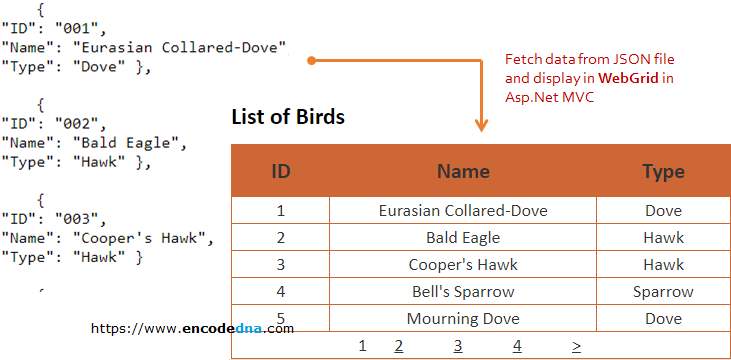
Data will be extracted from a file named birds.json. So, open the NotePad, copy the below JSON data in it and Save the file (with the name birds.json) inside the Project folder.
[
    {
    "ID": "001",
    "Name": "Eurasian Collared-Dove",
    "Type": "Dove" },

    {
    "ID": "002",
    "Name": "Bald Eagle",
    "Type": "Hawk" },

    {
    "ID": "003",
    "Name": "Cooper's Hawk",
    "Type": "Hawk" },
    {
    "ID": "004",
    "Name": "Bell's Sparrow",
    "Type": "Sparrow" },

    {
    "ID": "005",
    "Name": "Mourning Dove",
    "Type": "Dove"  },

    {
    "ID": "006",
    "Name": "Rock Pigeon",
    "Type": "Dove"  }
]
Or, you can use the data from this page.
Follow these steps.
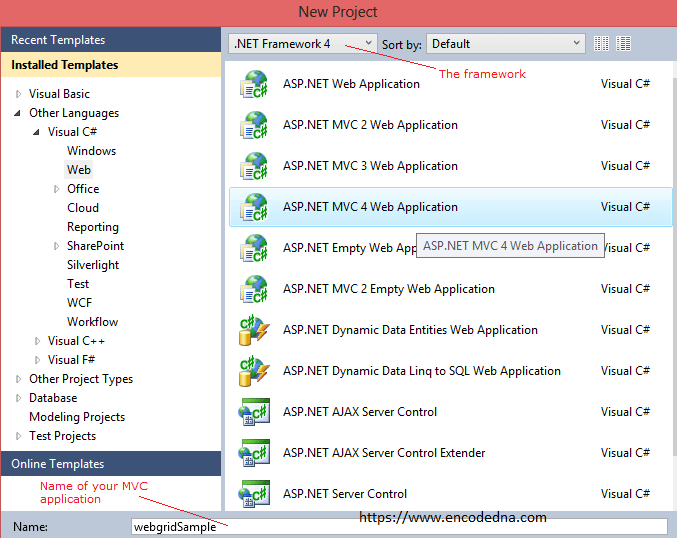
1) Open Visual Studio and from the File menu, choose New Project. From the New Project window, select Asp.Net MVC (version 4 or above) Web Application (choose the language you work with, C# or Visual Basic). Give it a name like webgridSample and click OK.

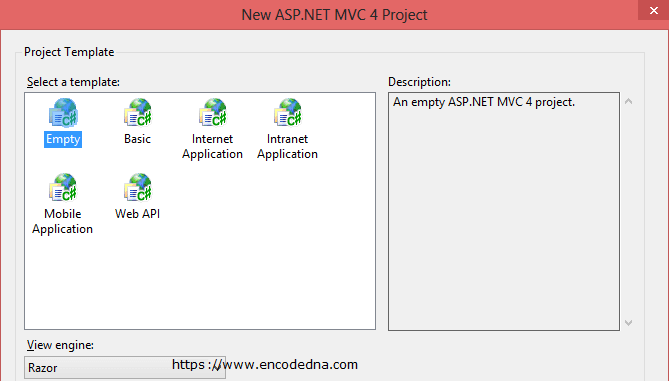
2) Choose an Empty template from the New ASP.Net MVC 4 Project window and click the OK button.

In the Model Class add some properties, similar to the nodes in JSON file.
C# Code
using System;
using System.Collections.Generic;
using System.Linq;
using System.Web;

namespace webgridSample.Models
{
    public class modelBirds
    {
        public int ID { get; set; }
        public string Name { get; set; }
        public string Type { get; set; }
    }
}
Visual Basic Code
Option Explicit On

Public Class modelBirds
    Public Property ID() As Integer
        Get
            Return m_ID
        End Get
        Set(value As Integer)
            m_ID = value
        End Set
    End Property
    Private m_ID As Integer

    Public Property Name() As String
        Get
            Return m_Name
        End Get
        Set(value As String)
            m_Name = value
        End Set
    End Property
    Private m_Name As String

    Public Property Type() As String
        Get
            Return m_Type
        End Get
        Set(value As String)
            m_Type = value
        End Set
    End Property
    Private m_Type As String
End ClassA controller is where we'll extract or fetch data from the JSON file and populate a List object with the data.
But first, we'll have "import" two namespaces in our Controller. See the "two" namespaces are highlighted in below code.
C# Code
using System;
using System.Collections.Generic;
using System.Linq;
using System.Web;
using System.Web.Mvc;

using webgridSample.Models;
using System.IO;
using System.Web.Script.Serialization;

namespace webgridSample.Controllers
{
    public class birdsController : Controller
    {
        List<modelBirds> theBirds = new List<modelBirds>();

        public ActionResult viewBirds(modelBirds list)
        {
            string sJSONfile;
            sJSONfile = Server.MapPath("birds.json");

            using (StreamReader sr = new StreamReader(sJSONfile))
            {
                JavaScriptSerializer json = new JavaScriptSerializer();

                theBirds = json.Deserialize<List<modelBirds>>(sr.ReadToEnd());
            }

            return View(theBirds);
        }
    }
}Note: if you cannot find JavaScriptSerializer or System.Web.Script.Serialization in your project, then refer this tutorial...
Option Explicit On

Imports System.IO
Imports System.Web.Script.Serialization

Namespace webgridSample
    Public Class birdsController
        Inherits System.Web.Mvc.Controller

        Dim theBirds As New List(Of modelBirds)()

        Function viewBirds(list As modelBirds) As ActionResult

            Dim sJSONfile As String
            sJSONfile = Server.MapPath("birds.json")

            Using sr As New StreamReader(sJSONfile)
                Dim json As JavaScriptSerializer = New JavaScriptSerializer()

                theBirds = json.Deserialize(Of List(Of modelBirds))(sr.ReadToEnd())
                ' Debug.Print(theBirds.Count)
            End Using

            Return View(theBirds)
        End Function

    End Class
End Namespace
Wanna keep this simple? Ok, then you can show the JSON data (extracted from a file) in an HTML table in Asp.Net MVC. Check this out.
Finally, we'll create the View.
Open the Solution Explorer window.
1) Right click the Views folder, add a New Folder, and rename it as products. I am creating the View inside products folder.
2) Right click the products folder, roll the mouse over the Add option, and click the View option.
Inside the View, I have created a WebGrid object, which has paging enabled with a limit of 5 pages.
I have also applied style to the WebGrid in the beginning.
C# Code
<style>
    .grid {
        font-size: 18px;
        width: 700px;
        border: solid 1px #CD6736;
        width: 300px;
    }
    .grid td, th {
        padding: 2px;
        border: solid 1px #CD6736;
        text-align: center;
        text-transform: capitalize;
    }
    .grid-header {
        background-color: #CD6736;
    }
    .grid-footer {
        text-align: right;
    }
</style>

@{
    ViewBag.Title = "The Birds";
    WebGrid objWG = new WebGrid(Model, rowsPerPage:5);
}

<h2>List of Birds</h2>

@objWG.GetHtml(
    columns: objWG.Columns (
        objWG.Column("ID"),
        objWG.Column("Name"),
        objWG.Column("Type")
    ),
    tableStyle: "grid",
    headerStyle: "grid-header",
    footerStyle: "grid-footer"
)
Visual Basic Code
<style>
    .grid {
        font-size: 18px;
        width: 700px;
        border: solid 1px #CD6736;
        width: 300px;
    }
    .grid td, th {
        padding: 2px;
        border: solid 1px #CD6736;
        text-align: center;
        text-transform: capitalize;
    }
    .grid-header {
        background-color: #CD6736;
    }
    .grid-footer {
        text-align: right;
    }
</style>

@Code
    ViewData("Title") = "The Birds"
    Dim objWG As New WebGrid(Model, rowsPerPage:=5)
End Code

<h2>List of Birds</h2>

@objWG.GetHtml(
    columns:=objWG.Columns(
            objWG.Column("ID"),
            objWG.Column("Name"),
            objWG.Column("Type")
        ),
        tableStyle:="grid",
        headerStyle:="grid-header",
        footerStyle:="grid-footer"
    )
One last thing you have to do (to avoid The resource cannot be found error), is to make some changes in the RouteConfig.cs (or RouteConfig.vb) file in MVC.
Open Solution Explorer again and expand the App_Start folder.
Open RouteConfig.cs file and update the controller and action values.
Change this ... defaults: new { controller = "Home", action = "Index", id = UrlParameter.Optional }
to this... defaults: new { controller = "birds", action = "viewBirds", id = UrlParameter.Optional }
Now, run the application.
Similarly, you can use an XML data instead of JSON to do the same. See this XML example...
