-----------------
If you are new to AngularJS, then I recommend you to read my first article that I have written for beginners.
👉 AngularJS Tutorial for Beginners – My First AngularJS App Hello World
-----------------
As you know, AngularJS $http is a service that provides functionalities to receive (get) and send (post) information to a remote http server. Therefore, it’s a valid request, I must find a solution, and this is it.
Note: Since I am using FormData in my example here, I want you to know, that Internet Explorer 9 and its previous versions does not work with FormData.
👉 You can also do multiple file upload using XMLHttpRequest and Web API Read this article. 
Web API controller
This example uses a Web API controller to upload files. I have already created the controller before and I want you to check it. Click the below link and follow the steps to create the API.
The Web API Controller with the File Upload Procedure
What am I Doing in this Example?
I’ll first create a Custom directive in the scope. Why do I need a directive? An AngularJS directive attaches a special behavior to an HTML element, via the element’s attribute, name, classes etc. Please read the AngularJS doc to learn more about directives.
AngularJS built-in ng-model directive do not work with file input element. In-addition, we need a (event) listener that will help us track any changes in the elements behavior, for example, selecting files. To overcome this drawback, I’ll create a custom directive to listen to any change that occurs in the element. We can achieve this via the directives link option.
<!DOCTYPE html>
<html>
<head>
  <title>AngularJS File Upoad Example with $http and FormData</title>
  <script src="https://ajax.googleapis.com/ajax/libs/angularjs/1.4.4/angular.min.js"></script>
</head>

<body ng-app="fupApp">
    <div ng-controller="fupController">

        <input type="file" id="file1" name="file" multiple
            ng-files="getTheFiles($files)" />

        <input type="button" ng-click="uploadFiles()" value="Upload" />
    </div>
</body>
I have attached an attribute called ng-files to the file input element. Now, I must create a directive in the controller matching the attribute, to get access to the file input element. The attribute has a function named getTheFiles() with a parameter $files. I’ll initialize the parameter $files in my directive and later call the function getTheFiles() using the controller’s scope, along with $files parameter.
<script>
    angular.module('fupApp', [])
        .directive('ngFiles', ['$parse', function ($parse) {

            function fn_link(scope, element, attrs) {
                var onChange = $parse(attrs.ngFiles);
                element.on('change', function (event) {
                    onChange(scope, { $files: event.target.files });
                });
            };

            return {
                link: fn_link
            }
        } ])
        .controller('fupController', function ($scope, $http) {

            var formdata = new FormData();
            $scope.getTheFiles = function ($files) {
                angular.forEach($files, function (value, key) {
                    formdata.append(key, value);
                });
            };

            // NOW UPLOAD THE FILES.
            $scope.uploadFiles = function () {

                var request = {
                    method: 'POST',
                    url: '/api/fileupload/',
                    data: formdata,
                    headers: {
                        'Content-Type': undefined
                    }
                };

                // SEND THE FILES.
                $http(request)
                    .success(function (d) {
                        alert(d);
                    })
                    .error(function () {
                    });
            }
        });
</script>
</html>
I’ll divide the above script into two parts to explain. The first part is my directive with a name ngFiles (matching the file input attribute ng-files and the second part is the controller.
👉 Do you know you can read data from an Excel worksheet in AngularJS using Web API in MVC 4? Check out this article. 
The Custom Directive ngFiles
The directive has the link option that takes a function.
link: function (scope, elm, attrs) { ... }
I have explicitly defined a function for the link and named it fn_link. The purpose of using the link option is to capture any changes that occur in the file input element. Now, how do we get the values? The answer is AngularJS $parse service. Usually, a $parse takes an expression and returns a function and our link option, also, needs a function to return. The parsed function onChange will have two parameters. The first parameter is the scope and the second will add the files details in $files variable through the event object.
The Controller
Now, we will access the files in our controller using getTheFiles() function. Its parameter $files will provide all the file details. Angular will call this function immediately when you select the files from a folder. The change callback in our directive will trigger this event. You can check the details of the selected files in your browser console.
$scope.getTheFiles = function ($files) {
    console.log($files);
};
The information that you gather in this function will help you do some verification check on each file. I am not doing any verification check, however you can. You can check and allow specific file types only for upload or you can sum up the total size and check if it does not exceed the permissible limit etc.
console.log($files[0].type);
Once I get the details, I’ll run a loop using angular.forEach() to extract each file and save it in a FormData() object. The FormData object will provide the data to the $http service (using data property).
console.log(key + ' ' + value.name);
The second function uploadFiles in the controller is called when you click the upload button on the page. I have declared a variable request to accumulate all the information, before passing it to the $http service.
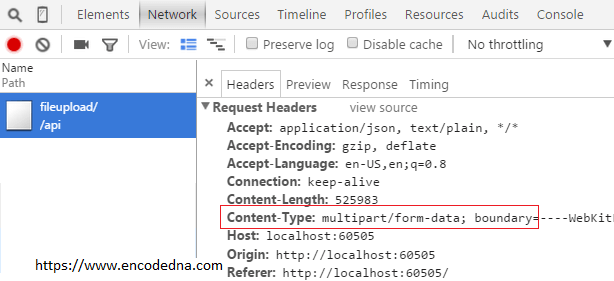
I have set the $http header as ‘Content-Type’: undefined. The browser will set the type to multipart/form-data. You can confirm this by checking your browser's Developer Tools. If you are using Chrome, then press “Ctrl+Shift+I” keys to open developer tools. Choose the Network tab (second from left) to open it. Do this after you have uploaded the files. See the image.

If everything goes well according to your execution plan, $http service will send the files to your Web API controller class and it will do the rest.
