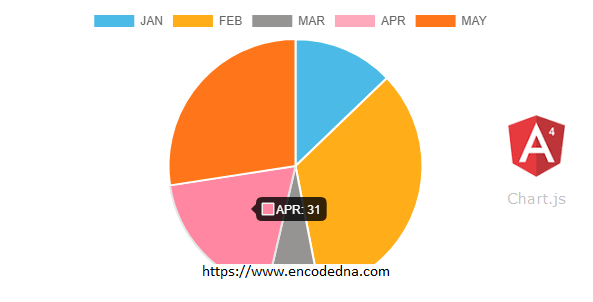
In my previous article, I have shared an example showing how to create a Bar Chart in Angular using Chart.js and ng2-charts. In that example, too I have used dynamic data for the chart and extracted the data from an External JSON file.
For Pie charts however, the data structure is slightly different from the Bar chart (in my previous tutorial).
JSON Data in a File
Let us assume, I have sales figures (numbers) for various months in a Year. I’ll save the numbers in the JSON file.
[{ "data": [47, 9, 28, 54, 77] }]
Name the file as sales.json and save it in assets folder inside the src folder.
👉 Well, you should also try the HighCharts API to create simple, interactive and animated charts in Angular 
Create the Chart
Create the Angular Project and install Chart.js and ng2-charts using npm.
npm install chart.js –save
followed by
npm install ng2-charts --save
You’ll have to install both the libraries inside your project folder.
Open .angular-cli.json file (it should be inside the project folder) and add the below script.
"scripts": ["../node_modules/chart.js/dist/Chart.min.js"],
Import ChartsModule and HttpClientModule to the Project
We’ll import two separate modules to our app module. The first is the ChartsModule for the charts and second in the HttpClientModule module to access HttpClient services (to extract JSON data from a file).
Open app.module.ts under src/app folder and copy the below code.
import { BrowserModule } from '@angular/platform-browser';
import { NgModule } from '@angular/core';
import { AppComponent } from './app.component';

import { ChartsModule } from 'ng2-charts'
import { HttpClientModule } from '@angular/common/https';

@NgModule({
  declarations: [
    AppComponent
  ],
  imports: [
    BrowserModule,
    ChartsModule,
    HttpClientModule
  ],
  providers: [],
  bootstrap: [AppComponent]
})
export class AppModule { }
Create the Chart Component
The component class is where we add options, properties and data to the Pie chart.
import { Component, OnInit } from '@angular/core';

import { HttpClient } from '@angular/common/https';
import { HttpErrorResponse } from '@angular/common/https';

@Component({
  selector: 'app-root',
  templateUrl: './app.component.html',
  styleUrls: ['./app.component.css']
})
export class AppComponent {
    constructor (private httpService: HttpClient) { }

    // ADD CHART OPTIONS.
    pieChartOptions = {
        responsive: true
    }

    pieChartLabels =  ['JAN', 'FEB', 'MAR', 'APR', 'MAY'];

    // CHART COLOR.
    pieChartColor:any = [
        {
            backgroundColor: ['rgba(30, 169, 224, 0.8)',
            'rgba(255,165,0,0.9)',
            'rgba(139, 136, 136, 0.9)',
            'rgba(255, 161, 181, 0.9)',
            'rgba(255, 102, 0, 0.9)'
            ]
        }
    ]

    pieChartData:any = [
        {
            data: []
        }
    ];

    ngOnInit () {
        this.httpService.get('./assets/sales.json', {responseType: 'json'}).subscribe(
            data => {
                this.pieChartData = data as any [];	 // FILL THE CHART ARRAY WITH DATA.
            },
            (err: HttpErrorResponse) => {
                console.log (err.message);
            }
        );
    }

    onChartClick(event) {
        console.log(event);
    }
}
I have set a single option for the Pie chart, that is, it must be responsive.
pieChartOptions = {
    responsive: true
}
Next, I have defined labels for various months.
pieChartLabels = ['JAN', 'FEB', 'MAR', 'APR', 'MAY'];
A Pie chart has different slices for each segment of data. Therefore, it will be nice to add different background colors to each slice.
pieChartColor:any = [
    {
        backgroundColor: ['rgba(30, 169, 224, 0.8)',
        'rgba(255,165,0,0.9)',
        'rgba(139, 136, 136, 0.9)',
        'rgba(255, 161, 181, 0.9)',
        'rgba(255, 102, 0, 0.9)'
        ]
    }
]
Every color is separated by a comma. You can use rgb() or hex colors.
Finally, the data part. I have created an empty data array, which I’ll populate inside ngOnInit() method. Here I am using Angular HttpService Get() to make a https request, to extract data from the JSON file.
Note: Always import OnInit (import { Component, OnInit } from '@angular/core';) to implement ngOnInit() in your component class. This is not mandatory. However, it is considered best practice.
ngOnInit () {
    this.httpService.get('./assets/sales.json', {responseType: 'json'}).subscribe(
        data => {
            this.pieChartData = data as any [];
        },
        (err: HttpErrorResponse) => {
            console.log (err.message);
        }
    );
}ng2-charts are rendered using on an HTML <canvas> element. Therefore, lets add a canvas to our application template with chart properties.
<div>
  <canvas
      baseChart
      [chartType]="'pie'"
      [datasets]="pieChartData"
      [labels]="pieChartLabels"
      [options]="pieChartOptions"
      [legend]="true"
      [colors]="pieChartColor"
      (chartClick)="onChartClick($event)">
  </canvas>
</div>
Properties
• ng2-charts provides a single directive called the baseChart for all types of charts. I have declared the directive in the template with the <canvas>.
• Next, I have defined the chartType as pie.
• datasets – An array of objects (pieChartData) that contains an array of data and labels.
Note: The options are case sensitive.
• labels – An array of labels (pieChartLabels). JAN, FEB and MAR etc.
• options – The chart options (pieChartOptions), provided in the form of an object. I have set a single option for the chart that is responsive: true (see the component class). This option will ensure that the chart is visible in any devise.
• legend – A Boolean true or false to ensure if a legend should be shown above the chart (or not).
• colors – Colors are defined (pieChartColor) to highlight different months data in different colors.
