Last updated: 17th October 2022
Here in this post I’ll show you how to add HTML elements like textbox, label etc. dynamically on a web page or application using jQuery. You can do this using plain old JavaScript. However, if you are using jQuery in your project, this post is useful.
To add and remove elements dynamically, I’ll be using few jQuery methods like append(), after() and remove() in the example here.
Do you know, you can do this using plain JavaScript. Check this out.
These elements that are created dynamically, can have attributes and properties. The properties and attributes are assigned dynamically while creating and adding them on the web page. And after accomplishing a particular task, the controls can be removed from the page. In fact, a single form or page can be designed to reuse again and again for various purpose.
See this post
How to clone a textbox without its value using jQuery .clone() method
The Scenario
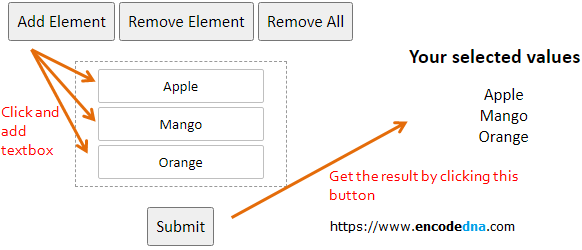
The entire scenario can be understood with the help of a small program.
I'll create a container using a DIV element, in which the dynamically created "textboxes" and "button" will be appended (or added0. So when the page loads, it will display 3 predefined "buttons", whose primary function will be to add and remove the elements.
Along with the textboxes, we will also create and add another button to Submit the values in the textboxes. The Submit button will be created just once, and for the textboxes, we are setting a limit of 20 textbox per container.
<html>
<head>
    <script src="https://ajax.googleapis.com/ajax/libs/jquery/1.7.1/jquery.min.js"></script>
    <script src="https://ajax.googleapis.com/ajax/libs/jqueryui/1.9.1/jquery-ui.min.js"></script>
</head>

<body>
    <!--Add three function buttons -->
    <div id="main">
        <input type="button" id="btAdd" value="Add Element" class="bt" />
        <input type="button" id="btRemove" value="Remove Element" class="bt" />
        <input type="button" id="btRemoveAll" value="Remove All" class="bt" /><br />
    </div>
</body>

<script>
    $(document).ready(function() {
        var iCnt = 0;
        // CREATE A "DIV" ELEMENT AND DESIGN IT USING jQuery ".css()" CLASS.
        var container = $(document.createElement('div')).css({
            padding: '5px', margin: '20px', width: '170px', border: '1px dashed',
            borderTopColor: '#999', borderBottomColor: '#999',
            borderLeftColor: '#999', borderRightColor: '#999'
        });

        $('#btAdd').click(function() {
            if (iCnt <= 19) {

                iCnt = iCnt + 1;

                // ADD TEXTBOX.
                $(container).append('<input type=text class="input" id=tb' + iCnt + ' ' +
                    'value="Text Element ' + iCnt + '" />');

                // SHOW SUBMIT BUTTON IF ATLEAST "1" ELEMENT HAS BEEN CREATED.
                if (iCnt == 1) {
                    var divSubmit = $(document.createElement('div'));
                    $(divSubmit).append('<input type=button class="bt"' +
                        'onclick="GetTextValue()"' +
                            'id=btSubmit value=Submit />');
                }

                // ADD BOTH THE DIV ELEMENTS TO THE "main" CONTAINER.
                $('#main').after(container, divSubmit);
            }
            // AFTER REACHING THE SPECIFIED LIMIT, DISABLE THE "ADD" BUTTON.
            // (20 IS THE LIMIT WE HAVE SET)
            else {
                $(container).append('<label>Reached the limit</label>');
                $('#btAdd').attr('class', 'bt-disable');
                $('#btAdd').attr('disabled', 'disabled');
            }
        });

        // REMOVE ONE ELEMENT PER CLICK.
        $('#btRemove').click(function() {
            if (iCnt != 0) { $('#tb' + iCnt).remove(); iCnt = iCnt - 1; }

            if (iCnt == 0) {
                $(container)
                    .empty()
                    .remove();

                $('#btSubmit').remove();
                $('#btAdd')
                    .removeAttr('disabled')
                    .attr('class', 'bt');
            }
        });

        // REMOVE ALL THE ELEMENTS IN THE CONTAINER.
        $('#btRemoveAll').click(function() {
            $(container)
                .empty()
                .remove();

            $('#btSubmit').remove();
            iCnt = 0;

            $('#btAdd')
                .removeAttr('disabled')
                .attr('class', 'bt');
        });
    });

    // PICK THE VALUES FROM EACH TEXTBOX WHEN "SUBMIT" BUTTON IS CLICKED.
    var divValue, values = '';

    function GetTextValue() {
        $(divValue)
            .empty()
            .remove();

        values = '';

        $('.input').each(function() {
            divValue = $(document.createElement('div')).css({
                padding:'5px', width:'200px'
            });
            values += this.value + '<br />'
        });

        $(divValue).append('<p><b>Your selected values</b></p>' + values);
        $('body').append(divValue);
    }
</script>
</html>Let us now find out what methods we have used in the program and what are uses.
jQuery append() Method
The append() method will add elements one after the other. A new element is added at the end of the last element. This method is attached with the dynamically created DIV elements, which serves as a container.
$(container).append()
$(divSubmit).append()
jQuery remove() Method
We used the remove() method for two particular reasons. The first purpose is to remove the controls one by one. The second time we used the method to remove all the elements attached to the container. Usually, the method remove() is used immediately after submitting the form or to reset a container or the entire page.
jQuery after() Method
The after() method helps in keeping the sequence proper while adding all the elements to the main container. We will add the submit button after all the textboxes have been added.
$('#main').after(container, divSubmit);
Also try… jQuery prepend() Method
This method will add an element at the beginning of the list of elements. So the newly added element will be at top of the list, followed by the elements added before. We are not using it in our demo, but you can do it yourself by making a slight change.
Modify this code…
$(container).append('<input type="text" id=tb' + iCnt + ' value=' + iCnt + ' />');
with this …
$(container).prepend('<input type="text" id=tb' + iCnt + ' value=' + iCnt + ' />');
Simple, but useful. You can now add any number of elements on your web page dynamically using the above procedures and methods. However, if you want to add text to an existing DIV element using jQuery, then I would recommend that you check this article now.
